
If you want to start development using JavaScript and CSS, you would better choose Google Chrome Canary DevTools.
- Begining
- Persisting Network Resources and Local Overrides
- 1) Filesystem Tab and Overrides Tab
- 2) Local Overrides
- 3) 1st Example of Local Overrides
- 4) 2nd Example of Local Overrides
- 5) Example of application of script implementation / debug work page
- Ending
Begining:
There were two events in last December, that was something undesirable for someone like me who uses DevTools occasionally when needed. One was Chrome Canary DevTools’ Local Overrides feature specification change, the other was that Mapping features were removed from regular Chrome DevTools.
In this article, I will describe for Local Overrides, the new feature of Chrome Canary DevTools implemented instead of Mapping feature, with two examples.
One of examples is for a demo, another is for a practical application example.
However, some settings are required for both Chrome Canary Browser and DevTools to make this new feature available, due to the changes in last month. “Both” means that we need to install Chrome Canary to use Local Overrides.
As for this setting, it has been explained in this linked page [Chrome DevTools: Edit production websites with Network Overrides]. I recommand you to read it first if you did not know those changes.
Also, the description of this article is based on WordPress site examples because I have only WordPress website. On platforms other than WordPress, there is a possibility that it may not match your situation, but most things can be accomplished by your devising.
I’d like to say the conclusion I got by using Local Overrides first.
That’s the same for those who had been plagued with debugging scripts on Chrome DevTools.
There is no difficulty with implementing and debugging scripts anymore. You can understand the power of override simply by reading “Local Overrides” section of this article. And you should be ready for using it.
Persisting Network Resources, and Local Overrides
With the updates of Chrome Canary, two new tabs, the File System Tab and the Overrides Tab, have been added to the Sources Panel. I will describe what I got by using these two tabs before explaining Local Overrides.
As this section got a little bit longer, if you want to get used to Local Overrides operations now, you would better go to the description of Local Overrides, or to the application example section.
1) Filesystem Tab and Overrides Tab (back to menu)
First of all, I will confirm how to use the following two terms. The term “Network Resources” in the following description means the resources displayed on the Network Tab of the Sources Panel. These resources are stored in the physical memory of the machine you are currently using. These are not resources that currently reside on remote websites.
Also, the term “HDDs” is used as a symbol for all storage devices those are accessible from client machines, including HDD in your machine, the LAN storage, and the cloud storage like Windows OneDrive.
Then, let’s see the difference between the Filesystem Tab and the Overrides Tab.
The first table below shows the type of website to be developed, and the second table shows the types of Local Resources operated by the developer on the tab.
| Tab name | Target website | Main features |
| Overrides | Remote website | Direct operation of Local Resources, and overrides Network Resources |
| Filesystem | Website for development | Direct operation of the development project resources |
| Tab name | Persisted Resources |
| Overrides | Network Resources saved to HDDs by [Save for overrides] command |
| Filesystem | Project resources added to the Workspace by [Add folder to workspace] command |
Looking at these two tables, you can see that working on the Filesystem Tab is suitable for building website. On the other hand, you can see that working on the Overrides Tab is suitable for reconstructing existing website.
The features of the Filesystem Tab are what we could do with previous Mapping features.
In this upgrade, the role and the operation method of Rocal Resources have become much clearer, as effective Local Resources that can be added to Workspace are limited to the resources of the development project.
The fact that the Overrides Tab was added became a breakthrough upgrade, because the important features same as the features of the Filesystem Tab: script implementation, debugging etc, became available on the page downloaded from the remote website. The basis is (as you already know) Local Overrides.
Actually using each one, you can see that what you can do on these two tabs are quite similar.
In the development stage of the project, there is almost no difference between the features and usability of the Filesystem Tab and the Overrides Tab with overrides enabled. You can say that it is exactly the same.
Functionaly Relationship between Target Website and The Main Features of Each Tab:
On the Overrides Tab, developers directly operate Local Resources, those are the copies of Network Resources saved on HDDs. In order to reflect the operation contents (addition / deletion, modification / saving) of this local resource in the remote network resource, it is necessary to deploy the local resources on the remote website.
So, the progress of development is not normally reflected on current page of the remote website.
Developers directly operate the resources of the development project on the Filesystem Tab.
On this tab, the development website resources are equal to development project resources, so the progress of development will be reflected on the website itself in real time.
An easy-to-understand example of the development website is the standalone local host website.
Because it was in my head, I have compared it to the remote website, but the remote development website also exists normally, so it was not a good comparison.
If the operation such as adding / deleting, editing / saving on the resources in the website can be executed completely, that website is the development website. Therefore, you can see the WordPress website is a very powerful development website. However, WordPress contents can not be operated directly with DevTools.
Resources Persisted as Local Resources:
On the Overrides Tab, the selected network resource is persisted as a local resource on HDDs with command [Save for overrides]. As I wrote above, Local Resources are actually copies of Network Resources saved on HDDs. Before update these were placed on Workspace of DevTools, but now those are not.
On the File System Tab, developers operate the resources of the development project from the beginning. Therefore, the term “persisted resources” itself is meanless.
When using this tab, you need to be aware that Network Resources are completely dependent on the project resources. The project resources are absolutely not the copies of Network Resources persisted as Local Resources.
Properly Usage:
Those who do not have the development website, there is no choice other than the Overrides Tab. Of course there is nothing negative about that.
You can do most things what you can do on the Filesystem Tab, with the Overrides Tab. As already I pointed out, there is little difference between the features and operability of these two tabs.
However, it will be able to say that the Filesystem Tab is somewhat for professional developers.
With default settings of Chrome Canary DevTools, you can not debug the server resources such as PHP, but you can edit and save. Even this alone is very useful, but you can do more with using bug messaging feature of WordPress, and command [echo] of PHP.
After all, the answer of what the right way of use is … hmm.
It seems good to decide according to your approach difference. You shoud better create a development website If you want to develop complicated websites from the beginning. If you want to improve your existing site, you only need resources persisted to the local by the Overrides tab, and an FTP uploader to deploy them to your remote site.
2) Local Overrides (back to menu)
In this section, I will explain operation of script files such as JavaScript, jQuery, so I sometimes say “script file” or simply “script” instead of term “resources” on depending context.
Well, I quote the explanation text of Overrides setting tab of Chrome Canary DevTools’ Settings Panel in the bottom frame, so please take a look.
In that text, I have replaced a word “changed” in the original to “changes”. Since the Overrides settings tab was removed by the specification change in December, it became a precious explanation which can not be seen now.
Overrides allow you to modify a resources on a page,automatically save them to disk and reload the page with the changes persisted.
“Reload the page with the changes persisted”, that is, what we edited and saved on the local script file will be executed or will be executable, after page reloaded.
This could not be done until now. Actually, in the video of Chrome Dev Summit 2017, applauds and cheers came up from the audience when presenter Paul Irish demonstrated this operation.
You can see that in the section [Ever need to change something about a site], after around 2 minutes past from presentation start. He also explains the new features in various ways, so you’d better to see it once.
By the way, a little explanation is necessary for “automatically save them to disk “. Let me see the following quotation.
After setting up the persistence workspace, style changes made in the Elements Panel are automatically persisted. However, changes to the DOM are not persisted. Instead, changes to the elements of the Sources Panel are persisted.
From: Setup Persisrance with DevTools Workspace (Japanese Page)
In other words, it says that only the CSS changed in the Style Pane of the Elements Panel is saved automatically.
Changes on the Sources Panel, that is, changes on the editor need to be saved by CTRL + S shortcut of overwrite save, or command [Save as]. This can be said about not only to DOM but also to CSS files and script files.
For developers using mapping in the Workspace, this is a known fact. In fact, this explanation quotes the mapping part of the DevTools document, but what is being written is still valid.
Let’s finish the basic explanation and describe two Examples.
1st Example is a mimic of the demonstration in Chrome Dev Summit 2017.
Since this is an example of a too simple script execution procedure, if you are not struggling with script implementation and debugging, you may not be able to understand important points about this.
2nd Example is a practical example for those who wanted to start a script implementation and debugging now. In this example, we create a page that can test scripts freely by using of Local Overrides.
There are many things to do compared to 1st example, so you may think that it is not for beginners at all, but it is not. Sure, you have to do a lot of things, but each of those things is a simple procedure.
3) 1st Example of Local Overrides (back to menu)
This is a test to see how the changed content of the script persisted to HDDs as Local Resources, not the network script after the page reloaded, is executed. This is the Example I described in the Local Overrides section above.
Since the execution result only outputs “hello world” on the Console Panel, it’s not so exciting, but you can see the role of the local script file, which was merely disturbing element when mapped to the network script file, dramatically changed.
If there is no script file in the site, you would better skip this and go to next.
Overrides Tab Settings:
Launch Chrome Canary DevTools and do the following steps.
In the example below, I use my own JavaScript file, but for WordPress users, you can use functions.js in the theme’s js folder.
Initial Settings (include testing):
- (1) Select the Overrides Tab in the Sources Panel.
- (2) Click the Setup Overrides ( + icon) to add an empty folder.
- (3) Confirm that Enable Network Overrides are enabled.
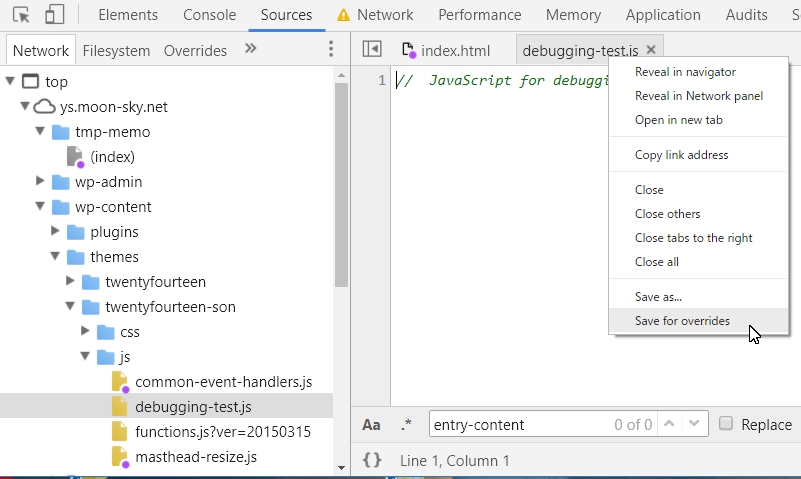
- (4) Select the js file to be persisted on the Network Tab and display the source code in the code editor.
- (5) Add code “console.log (‘hello world’);” to the beginning of the source code.
- (6) Right click on the source code, select command [Save for overrides] on the context menu.
- (7) Reload the current page after saving the file.
- (8) Open the Console Panel and check the result.
You can see “hello world” on the Console Panel.
Certainly, after reload the page, you can see that the command of the local script, not the reloaded network script, was executed. This behavior is exactly the opposite of the mapped script.
Here are some important notes.
These are not just this test, basic procedures you must follow whenever you use Local Overrides.
Notes on using Local Overrides:
- After enabling [Enable Network Overrides], reload current page immediately.
- When changing Local Resources, be sure to overwrite save it with CTRL + S.
- Always reload current page after overwriting and saving Local Resources.
In other words, if you change something, be sure to overwrite save it and make sure to reload current page before doing anything else. Failure to observe this may result in unintended rewriting in the CSS file.
On the other hand, nothing happens in script, so you can’t expect overriding.
If you do not plan to use Local Scripts in the future, choose command [Delete] on the context menu of the Overrides Tab to delete the script file. Here you reached the end of 1st example.
4) 2nd Example of Local Overrides(back to menu)
Here, we create a page (working page) that can be used continuously as a workspace for testing JavaScript and jQuery implementation and debugging. You can create a private fixed page easily on the WordPress website, but if it’s a difficult website you can use an existing published webpage.
Keep in mind the important phrase “continuously as a workspace”.
Those who start learning scripts, such as JavaScript and jQuery etc, without using the integrated development environment, will immediately face the difficult problem that they can not build a learning environment for themselves.
They can copy and test the samples of various sites, but because the elements used, the type of events, and the location of the scripts are different for each sample, they can not find a method and place to organize and store those samples. So, many beginners are remaining still beginners.
Do you think I said the above as if I were a professional developer?
No I’m not. I just wrote of my own problem I have ignored so far. That is, I am still a beginner in JavaScript.
However, the problem probably seems to have been solved.
Create and Deployment of a Fixed Page and a Working Script File for Working:
Creat Files Procedure:
- (1) Create a private fixed page for using as work page (#1).
- (2) Copy a slightly odd JavaScript code in the code window below into the text editor , and save it as “debugging-test.js”, or as different name you like.
- (3) Upload “debugging-test.js” to the js folder of your WordPress theme.
- #1:The empty page is OK, but it would be better to design layout so that you are easy to use. I use private fixed pages dedicated to drafts named “temp-memo” on my site, so I use that page for this example.
|
1 2 3 4 5 6 7 8 9 10 11 12 13 14 15 16 17 18 19 20 21 |
// JavaScript for debugging test. var devFlag = null; function cmdDebugTest() { return; if( devFlag ) { alert( 'Flag is true.' ); } else { if( devFlag == null ) { alert( 'undefined' ); return; } alert( 'Flag is false.' ); } } |
Overrides Tab Settings:
When setting up Local Overrides for the first time here, you need to specify the storage location of Local Resources with the [Setup Overrides] method. You can save it anywhere on HDDs, but you should avoid existing folders. Please refer to 1st example for this procedure.
Settings:
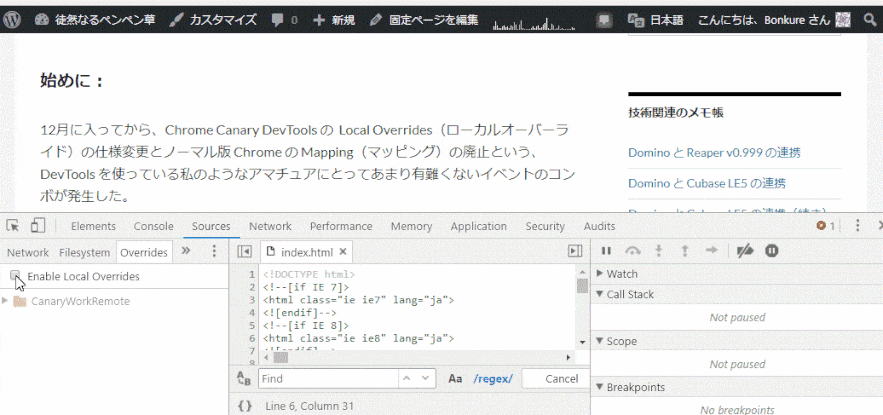
- (4) Open the fixed work page from the fixed page list and launch DevTools.
- (5) Turn on [Enable Local Overrides] check on the Overrides Tab, and reload current page.
- (6) On the Sources Tab, select (index) directly under the page URL to open it in the code editor.
- (7) Search the opening tag <div class = “entry-content”> on the code editor and copy the HTML of the code window below into the appropriate position of div.entry-content element.
- (8) Execute [Save for overrides] to make it persistent as a local file (#2).
- (9) Reload current page.
- (10) Since debugging.js is displayed in the js folder of the Sources Tab, select this and execute [Save for overrides].
- (11) Reload current page.
#2: At this time, index.html which overrides (index) , is persisted to HDDs. At the same time, a backup file named index.html 1 is also saved.
|
1 2 |
<input type="button" id="btn-1" value="Debug test" onclick="cmdDebugTest()"> <script type='text/javascript' src='http://[network directory of js folder]/debugging-test.js'></script> |
If you use an existing page for work page, delete all unnecessary content in the div.entry-content element in index.html, then add the required HTML(now the above HTML sample code) to.
Then you can use that page as a work page. You can see this example in the frame animation in the next section.
- Execute [Save for overrides] to make it persistent as a local file
Index.html which is the file overriding (index) has been persisted, but override has not been executed yet. Notice that debugging-test.js is not displayed on the Network tab.

- Reload current page
You can see that index.html worked as an override.
Procedures (10) and (11) are the steps to enable debugging-test.js as a rocal override file.
Please do not forget to reload current page three times in the case of new creation, and twice when you use the work page after creation. Although not shown, the same link file icon as index.html is added to the name of debugging-test.js.
This completes the persistence of index.html and debugging-test.js which are Rocal Overrides of (index) and network-debugging-test.js. From now on, you can edit and save these Local Overrides as you want, so that implement and debug the script.
The JavaScript sample code of this example is written with only a thought, and has little applicable value.
On the other hand, the HTML code can be expanded variously. The frame animation in the next section uses an example of slightly changed HTML.
The fact , that you can use any remote website page as a workspace for script implementation and debugging, and can persist the script file for overriding that page, is more important than the contens in the page and the script file.
5) Example of application of script implementation / debug work page (back to menu)
In WordPress, script files can be easily added / deleted, so I used them in the above procedure, but the use of files is not a necessary condition.
Let’s see the frame animation below.
This is an actual example that copied the contents of debugging-test.js completely into index.html and tested it. The point when the sentence part of the contents disappears and the button is displayed is the beginning, the point when the button disappears and the sentence is displayed is the end position.
Since the script file is not used, the js file registration part of the HTML sample code has been deleted.
This is an actual example using an existing page as a working page.
You can see that the problem mentioned at the beginning of this example section is solved easily.
In the description and animation so far, it may seem that only the problem of the location of the script is solved, but of course it is not.
For example, you can test setting the scope of CSS immediately (#3).
You can test it quite freely by writing styles directly in index.html without using CSS files, preparing some elements and styles for range restrictions. Rather I’d like to say that you can do everything you need. Of course, you can also test of inheritance and overrides as well.
The animation has a simple test of the scope of the input element.
Changing properties is just a demo. The point is that this input element is positioned below the empty class type style of [bon-full-width] specified in the class attribute of the body element.
If you do not want to mix these tests, you can save them as names of index-debugging.html, index-css-scope.html, index-style-inherit.html etc. When using it, return the name to index.html. I think this will be a good example of [organize and store], but how do you think?
Ending (back to menu)
While writing this article, I became strongly convinced that beginners should use Chrome Canary DevTools instead of regular Chrome DevTools.
However, last December, the Overrides Tab of Canary DevTools suddenly disappeared (I wrote that the issue occurred on December 4th in bug report 791446, but it is correctly December 2nd), after that the tab does not appear at all.
Finally the report ended in status “WontFix”, and I got into a state I do not know what to do.
Since I had no choice, I stoped to write this article, and I was killing time by creating an sf2 file using the recorded wav data of Moon JJ Electric Bass. And this time, suddenly, there was an unexpected problem that Mapping feature of regular Chrome DevTools was deleted.
This means, that for many users who have used Mapping so far, only the choices to use Local Overrides of Chrome Canary DevTools remain.
Fortunately, I could find a way to make Local Overrides available, but I could not find Japanese information about Local Overrides at all. I want to complain about that a bit … But to whom ?